donderdag 31 oktober 2013

The crazy world of sweet and savory pancakes

I don't like pancakes, never really have. In Holland pancakes are the number 1 favorite food of kids. Well the pancakes have to share the number 1 spot with fries, but not a bad place to be. I think everybody eats some kind of pancakes when growing up. In Holland we have a pancake, similar in size to the French crepe, but in thickness closer to the American pancake. Served mostly as one of Holland's favorites kids birthday party meals.

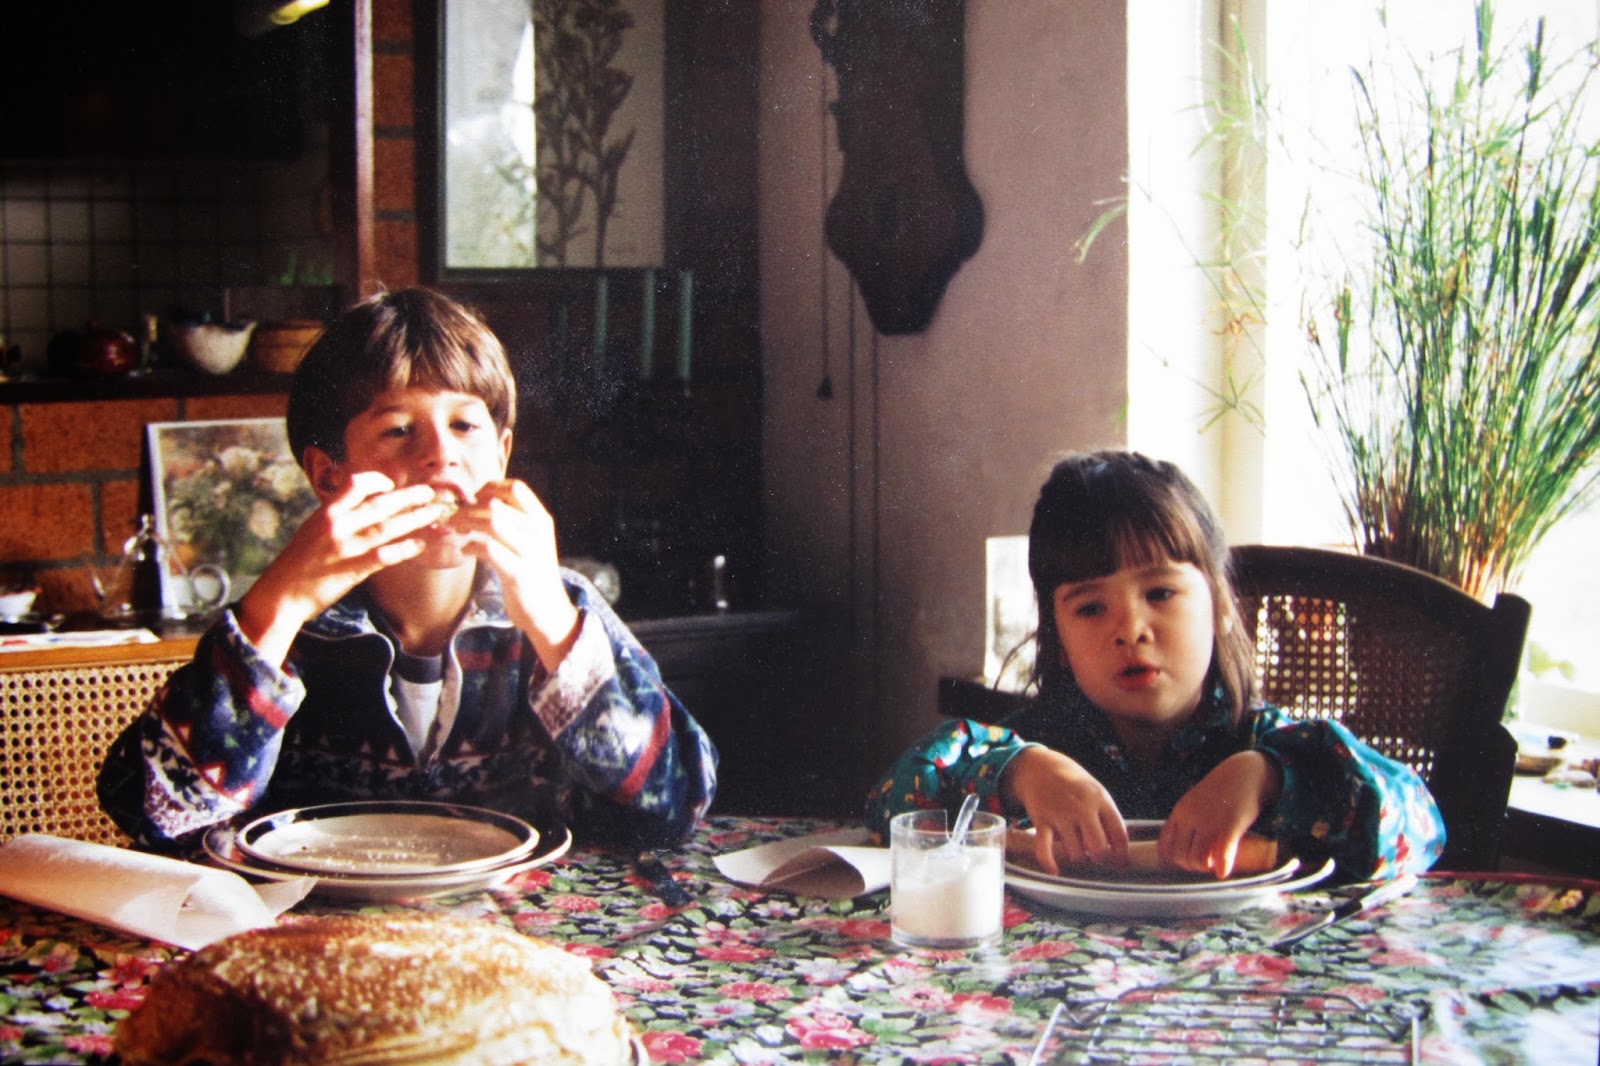
Eating pancakes after a day of apple picking in Reeuwijk, Holland, somewhere in the end '90s

I'm happy to say that my mom always made very thin pancakes. So that substance and thickness already made me happier then the pancakes I would get at birthday party's. The biggest problem that I had was the sweetness of it all. I don't have a sweet tooth, so sprinkles, sugars, fruits, syrups, whipped cream, even ice cream didn't do it for me. Afterwards I was always bloated, it felt like I had a dinner-size dessert instead of a meal. But a pancake has two sides, sweet and savory. In my years I came around some savory pancakes, like the ones with cheese or mushrooms or bacon. But somehow Dutchies always cover or drown them in syrup, making it not appealing for me.  

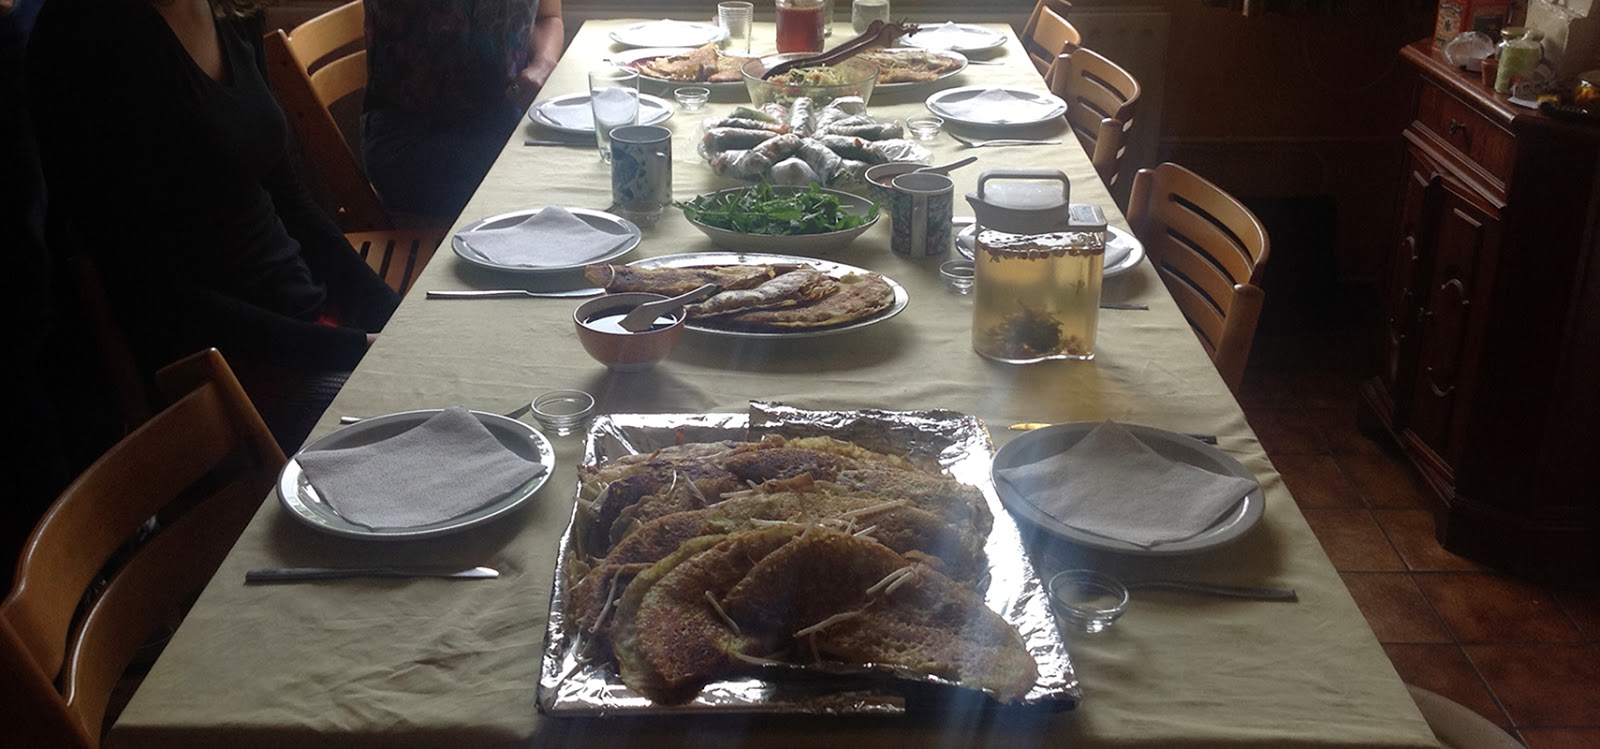
But there always was one pancake I liked, a savory one, stuffed with greens and dipped in sauce. I'm talking about Bánh xèo, the Vietnamese pancake. I remembered the first time I saw it. I was six and visiting my family in Los Angeles. I remembered I walked into the backyard, many tables were set and family arrived. The tables were filled with platters of lettuce leaves and herbs. My aunt was slaving away in the outside kitchen, popping out one after an other. Yellow crisp pancakes, stuffed with beansprouts, meat and shrimps. The smell filled my nose and I was sold. The first bite I still remember. How crispy and light the pancakes, the flavors of the meats, herbs and spices, the crunch of the lettuce and herbs, all in a Nouc Mam Cham sauce. 

  
As I said before, a pancake has two sides. It won't be honest to only look at the savory side, so I won't. Or even better I don't have to. Because since a few months I'm making sweet pancakes more often. And these sweet pancakes, I adore and my younger brother with me! 

The best thing about both these pancakes is that they're dairy and egg free. I don't really like dairy products, always have a feeling that it is not ok to drink another species's maternal milk. The milk is replaced with plant-based milks. Lighter on the stomach and easier to digest. And in my opinion, cutting down on eggs is never a wrong move. So first up, the savory pancakes. For the sweet ones, stay tuned, or scroll down, up to you. 

Bánh xèo vegetarian and non-vegetarian versions
for the pancake batter
200 ml sunfloweroil
400 ml of coconutmilk
400 ml of water
Pinch of salt
Optional: Chopped chives
1 package of bot banh xeo, already mixed riceflour with a pack of tumeric, available in asian markets

In a mixing bowl, put together the bot banh xeo flour mix, the tumeric, the coconutmilk, the oil, water, chives and a pinch of salt. Mix until everything is well combined, cover and set aside for at least an hour.
  

for the vegetarian filling
300 grams of bean sprouts
200 grams of mushrooms, fresh or dried, soak the dried ones before use, sliced
1 portion of Mai Tofu
1-2 onions
2 tablespoons of vegetarian oystersauce
2 tablespoons of soysauce

Chop the onions, add the soysauce and the mushrooms. Slice up the tofu and marinade in a oystersauce and pepper. Marinade for at least 15 minutes.

for the non-vegetarian filling
300 grams of bean sprouts
300 grams of raw shrips
200 grams of minced meat
1-2 onions
2 tablespoons of nouc mam
2 tablespoons of oystersauce 

Peel and clean the shrimp, let them marinade in oystersauce and pepper. Chop the onions and mix them in with the mince. Season with nouc mam and pepper. Marinade for 15-30 minutes in the fridge. Now stiryfry the mince, season well and set aside.
  

for the essembly
Oil a big skillet on medium-high heat. Pour in a ladle of batter and cover the bottom of the skillet. Cook the pancake for 2 minutes, then cover one half of the pancake with bean sprouts. Let it cook for 3-5 minutes and add the tofu and mushrooms / shrimp and mince. Let it cook for another 2-3 minutes. Fold the uncovered half over the covered half and take out of the skillet.

for the service
1 bunch of fresh mints
1 bunch of fresh cilantro/coriander
1 lettuce, washed leaves of one head
Vegetarian dipping sauce suggestions: Nouc Tuong Gnot (hoisin peanut sauce) or chillisauce
Non-vegetarian dipping sauce suggestions: Nouc Mam Cham (Vietnamese fishsauce)

Serve the pancakes crispy and lukewarm to warm. If you cover them to keep warm, they will lose their crispiness. Or pop them out of the skillet into a preheated oven 80 C/ 175 F until serving. Or pop them back into the skillet to warm and crisp up, just before serving.  Serve with the herbs, lettuce and dipping sauce.

------

For my sweet pancakes I always use almondmilk, now a days you can buy it easily in the supermarkets. But it's really easy to make it yourself.  

DIY Almondmilk for 1 liter of almondmilk   
200 grams of raw almonds
1 liter of water
1 tablespoon of honey, to make it vegan you can use another sweetner
pinch of salt
Optional: cinnamon, cloves, vanilla or soaked dried fruits, for flavoring the milk


Let the almond soak in water overnight. Wash them and put them in a blender. Add the water, salt and honey. I like to add around a teaspoon of cinnamon for taste. Now blits away, put the blender on high for a few minutes. Immidiatly you will see the almonds and water turn into a white liquid. When all the almonds are pulverized, taste and see if it needs more taste. Pour the mixture in a deep bowl by pouring through a cheesecloth (or the feet of an unused thin tight). Squize out all the milk, in the cloth you end up with a wet but lovely almond flour. In your bowl, a great almondmilk.   

Mai -almost vegan- pancakes
2 teaspoons of baking powder
1 teaspoon of ground cinnamon
Pinch of salt
1-2 cups of almond milk
2 tablespoons of honey
2 cups of whole wheat flour or spelled flour, or mix the flours, or use some almondflour from making the almond milk. 

In a large bowl, whisk together flour, baking powder, cinnamon and salt. In a separate bowl, whisk together the almond milk and honey until blended. Pour the milk mixture in the flour mixture and stir until evenly mixed. Set batter aside to rest for 10 minutes, the batter will thicken up. 


Oil a nonstick skillet and heat on medium heat until hot. Ladle about 1-2 tablespoons of batter into the skillet and cook about 2 minutes or until bottoms are golden. Flip and cook 1-2 minutes longer, until pancakes are cooked through. 

I always make a large batch of these pancakes. I let them cool down, put them in a ziptop bag and pop them in the freezer. So anytime you want a pancake, you just defrost, reheat and you have a great breakfast. A start to a fancy brunch or lunch or just as a little snack. Just drizzle some honey on top and you are good to go, the healthiest pancakes in the world. Or go a little less healthy and dress them up with icing sugar and some fresh fruits. Or going fancy all the way, with ice cream or whipped cream. 

------

In my opinion these two recipes shows the best sides of the pancake. A great Asian flavorburst savory pancake and a lovely sweet and healthy pancake! So if you're thinking about throwing a party, don't forget Holland's favorite party meal, let everybody enjoy a new side of the pancake!

woensdag 30 oktober 2013

Empty heart vegetable, kōng xīn cài (空心菜)

Water spinach, morning glory, swamp cabbage, chinese spinach, waterspinazie (Dutch), Kangkung (Indonesian, Malay), river spinach, Kalmi, Shak (Bangladesh), Chinese KangKong (Phillipines), ผักบุ้ง (Phak Bung, Thai), rau muống (Vietnamese), Chinese watercress, Trokuon (Khmer), 空心菜 (kōng xīn cài, Chinese), 通菜 (tūng cŏi, Cantonese), all different names for the same plant. The Ipomoea aquatica, a tropical semi-aquatic plant. It grows in swamps and is easy to cultivate, grown mostly in Asia as a common leave vegetable.


In Chongqing it took me a while to get or learn the chinese names of vegetables. In comparison with my Dutch colleagues to who all food were foreign and unknown, I recognized almost all the fruits and vegetables. But with the dutch or even the english names I was nowhere in Mid-China. After some weeks, or even months I unraveled some of the chinese Pinyin, characters and pronounciations. The first one I learned and never forgot was kōng xīn cài. Almost every restaurant serves this green vegetable. According to the taste of the province, it can be prepared with different seasoning. In Chongqing it is mostly with garlic and chilli. In Northern China with just with a little bit of soy or garlic. But always very clean and delicious, a great contrast with the sometimes heavy and greasy dishes. 

The reason I remembered the Chinese name of the vegetable was probably because of the explanation of the name. In my first month in Chongqing, one of my students took me out to dinner for my first Chongqing Hot Pot ('Every Chinese's favorite meal', a Chinese fondue, Chongqing version is filled with Szechuan pepper and red hotter than hot peppers and chillies). She ordered the vegetable and told me it's name. "Do you know the meaning?" She asked me. Of course I didn't, although my Chinese roots I don't speak the language, except the occasionally 'Thank you' and 'Enjoy your meal'. And even then, this was Mandarin, my family speaks Cantonese. "If you translate the name, it says hollow heart vegetable. It is hollow inside, you can see where it is cut." She told me in her heartedly English. I thought it was so beautiful, how poetically the Chinese named this vegetable. Appropriate but also a little sad, the idea that a vegetable can have a empty heart.


The first time I consciously ate it was a few years ago, together with one of my besties. Before my trips to America and China. We found a nice Thai-Vietnamese restaurant in Utrecht and went crazy for the flavors. We ordered Morning Glory with black beans and we love-love-loved it! Months later we traveled to California together and spend the first week with my cousins around LA. The big Asian cuisine-scene there gave us more morning glory. I went crazy for the stuff, it was easy to get. The restaurants served it and the market sold it. So now, whenever I go back to visit, my cousin or her mother-in-law makes it for me.

As a child I had favorite colors, flowers, dishes, music, artists, well I even had favorite people. But I never had a favorite vegetable. In time it just wears off, you stop stating your favorites like you did as a kid. But since about a year ago I started stating my new favorite vegetable; Morning Glory.

After my summer in California, back in Holland I started looking for the vegetable. I found it not far from home, in my local Asian market. I tried to recreate the taste. But it always stayed blend. When I came to China I fell in love with the vegetable, all over again. Because it was one of the few chinese vegetable names I knew, I always ordered it. My colleague was going crazy, because he'd always had to eat this vegetable. And after eating it almost every night, I started to break down the ingredients. Trying to compose a recipe. After consulting many cookbooks I finally found a way to make it the way I like it.


Mai Morning Glory 
1 bunch of morning glory
2 gloves of garlic
1 tablespoons of soybean paste, available at asian markets
Optional: 1/2 red chilli

Cut the vegetable in 8-10 cm length pieces. Wash carefully, the leaves will bruise easily. Blanch in just boiled water for a minute and drain. Heat some oil in a wok or frying pan, sautee the garlic (and chilli) and add the vegetable and season well. Stirfry for 1-2 minutes, the vegetable will get a bright green color. Now add the soybean paste with a tablespoon (or two) of water and stirfry for another 1-2 minutes on high heat. The liquids will evaporate and the steam will help to cook the morning glory. Now take of the heat and taste. Add more seasoning when you find it blend, some pepper, salt or even a little splash of soysauce will do the trick.

Serve immediately, as a vegetable dish on a Asian-style family dinner or just as the vegetables for your meal. Enjoy!

dinsdag 29 oktober 2013

Vietnamese Pho meets Thai Tom Yum

Pho is a traditional Vietnamese noodle soup. When I was small my family would only eat this when visiting my aunt and uncle in Paris. We would go to this one place in China Town. Everybody would get this huge bowl with noodles and soup. As a child I remembered I had to share it with my mom or brother, because it was so big. The contents almost looked endless back then. The table would fill up with herbs, bean sprouts, sauces and my favorite chinese donuts. Afterwards my belly would feel full and warm, real comfort.

Most of the times the broth is beef based. Chicken is also possible but less popular. The broth is made with bones, spices and a lot op patience. Because the most important element of the broth is time. I'm not that patients and when I do make it myself, the flavor of the broth is always a let down. So now the only time I eat it is in California. My cousin makes a killer Pho, but also the many vietnamese restaurants will always serve a great Pho! You will get big bowls, steaming with all the different add-ons on the side. The bowl is layered with some pho rice noodles, then covered with some raw thinly slices beef and topped with the lovely hot boiling broth. The broth will cook the beef in front of your eyes. Now you can choose from your plates of add-ons, bean sprouts, mints, cilantro, chopped green onions, lime. So when you find a way of getting to all this flavors in one scoop, you can dip the whole thing in black hoisin.


One of my other loves in Asian soups is Thai Tom Yum. Tom yum is a Thai hot an sour soup with prawns or sometimes other seafoods. I fell in love with this soup, spending my nights with my cousin and her hubby in Hollywood's Thai Town. Since then I sometimes order the soup, but I rarely eat Thai food in Holland. The last time was in Chongqing, when I went out for dinner with a colleague.

Around a week ago I was craving both. I was in no mood to take the hours to make the Pho broth. So I looked up some easy Tom Yum recipes, I found out it was dead simple to make your own. As long if you can balance the flavors right! This solved my soup craving, but I still missed the noodles. Letting my craving get out of hand I combined the Pho noodles and add-ons to the Tom Yum soup. And I have to say, magic happened!

Note: Indirectly I also found a solution to share these lovely soups and tastes with my friends. Now I could easily make a meat-less version. Making the soup not chicken or beef based, but just using vegetable or herb broth and replacing the fish sauce with soy sauce.

Vietnamese Pho meets Thai Tom Yum 
Vegetarian and non-vegetarian version for 4-6 people

For the Pho noodles and add-ons
1-2 package of Pho Noodles or rice noodles
Optional herbs and veggies: Green onions, bean sprouts, mint, cilantro, chopped chilli.
Optional add-ons: Lime wedges, peanuts (chopped or whole), pappadums (thin Indian crisps, you can buy them in almost every market. The Asian market has more flavors though, easy to prepare, just pop in the microwave for 30-45 seconds.)

For the Tom Yum soup base
2 liter of stock, chicken for the non-vegetarian version, vegetable or herb for vegetarian version.
2 stalks of fresh lemongrass, pounded
6 kaffir lime leaves
5 cm piece of fresh ginger of galangal, sliced
1-2 red chiles, sliced
3-4 gloves of garlic, minced
4 tablespoons of fish sauce for the non-vegetarian version
4 tablespoons of soysauce for the vegetarian version. 
2 teaspoons of sugar
1-2 limes, juice
1 cup of coconut milk
Optional protein: 300 grams of medium size raw shrimp or a portion of Mai tofu, diced.
Optional veggies: Chinese cabbage, mushrooms, daikon, cherry tomatoes, green beans, pumpkin, zucchini and many more, washed and cut

Bring the stock to the boil Add the lemongrass, kaffir lime leaves, galangal or ginger, and chiles. Lower the heat to medium-low, cover, and simmer for 15 minutes to let the spices infuse the broth. Prepare the noodles, follow the instructions on the package. Wash the herbs and cut the veggies.


Uncover the soup and add the fish sauce/soysauce, sugar, and vegetables. Simmer for 5 minutes. When using shrimp put them in and cook for about 8 minutes until they turn pink. Or add the tofu. Remove from the heat and add the lime juice. Taste for salt and spices; you should have a balance of spicy, salty, and sour. If it's to spicy for you, you can add the coconut milk now. But you can also serve it at the table, giving eveybody the chance to use as much coconut milk as they want.
I like eating this in a DIY-kinda way. By putting all the components on the table and letting everybody get what he wants. But I will explain how to  serve up a bowl. Place some bean sprouts in the bowl, cover with a hand full of noodles. Scoop some simmering soup over it. Now getting to the add-ons, you can add the green onion and herbs. Add some spoons of coconut milk to take the spiciness down. For some crunch, break some pappadums and crumble over the soup or toss in some peanuts. Serve with lime wedges on the side.

Note: Let people know that there are slices of ginger/galangal and chili inside, next to the lemongrass and lime leaves. You don't have to eat them, at this point they did the job of flavoring already.


This soup will make your flavorbuds go crazy, hitting every flavor on your tongue. This is why I love this kind of food. It's a light meal, but the soup will fill you up. Giving you a warm fuzzy feeling on the inside and a little buzz of the chilli, enjoy! 

maandag 28 oktober 2013

Dad and Mai secrets for making rocking tofu

I was raised eating tofu. So the taste was always familiar. But I have to say, if the tofu is not prepared well or seasoned, even I don't like it. One day, out of the blue, the secret was revealed. I was a teenager and my dad called me to the kitchen: "I'm gonna tell you the secret to making the best tofu. I've been working on it for years! Never tell anybody, otherwise they don't have a reason to come back to eat dinner at your place anymore."

I never listened to my dad, because for some years I've been telling a small group of people the trick of making great tofu. To get a nice soft on the inside, crispy on the outside basic tofu. From there on you can season the tofu in every way possible, spicy, salty. Stirfried, in soups, salads, the sky is the limit. Tofu is so versatile,  you can use it for almost anything!


For many years I've been making tofu the way my dad showed me. Making the basic tofu and spicing it up afterwards. Since a few months I found a recipe, one that works opposite of all the things my dad told me. But the end result is delicious!

My dad's secret to tofu success 
"Tofu is wet, so putting a wet substance in a marinade and frying it of, it's just not working. All the flavors will just slide of the tofu and in the end you have this blend tofu." This was my dads first explanation. "It's better to first fry it of and add the spices and flavors later. After frying the tofu is dryer and able to suck up flavor again!" And if you think about it, it's true. It's darn hard to let something suck up marinade if it's already full with water.

1 block of firm tofu
Paper towels
Sunflower or canola oil

Get the tofu out and dab it dry. Slice in 1/2-1 cm thick slices. Place them next to each other on a paper towel, now placing another paper towel over it and press down carefully. Get a non-stick frying pan and oil well. Now fry of the slices of tofu, turn around when it's browning. When golden brown on both sides, take it out. Get rid of the excess oil with paper towels. Let them cool down for a bit.

Mai secrets to spicing up dad's tofu
There are countless ways of flavoring your tofu. One of my favorites is inspired by spicy curry chicken skewers. A great vegetarian alternative and packed with flavor.

1/2 portion of dad's secret tofu
1/2 a chilli
1 glove of garlic
2 teaspoons of currypowder
1 tablespoon of soy sauce
Pepper and salt
Optional: Cilantro, spring onions.

Chop the chilli and garlic. In a frying pan, heat some oil on high heat. Cut the slices of tofu in 1/2-1 cm strips. When the pan is hot throw in the chilli and garlic, when it's sauteed add the strips of tofu. Give it a toss and add the currypowder. Toss until the curry is evenly spread, now add the soy sauce and a splash of water. Season to taste. When all the liquid is evaporated your tofu is done! Now you can dress it up with some cilantro or sliced spring onions. Doesn't only look pretty, taste great and gives it some crunchy freshness.


Another of my favorites you can also apply for tempeh. I always see tempeh as the Indonesian version of tofu, it's firmer and has whole soybeans. This flavoring gives it a nice sticky sweet chilli taste and goes well in stirfry's, but also in (glasnoodle) salads. In other words the flavor is as good as any other piece of meat will give the dish! 

1/2 portion of dad's secret tofu
1 shallot or other small onion
1 tablespoon of soysauce
1 tablespoon of ketjap manis
1-2 teaspoons of sambal
1-2 teaspoons of sugar

Chop the onion as fine as possible. Saute the onion in a hot oiled frying pan. Add the sauces, sambal, sugar and a splash of water. Wait till it's is bubbling away, now add the tofu and toss until the tofu is covered with the sauce. When all the liquid is sticking to the tofu it is done.

Mai secret to tofu success
I have to be honest, I stole this recipe. No, no great family secret story. And no, I didn't kill anybody for this recipe. My last trip to San Fransisco I spend my mornings next to my niece, watching Alton Browns 'Good Eats'. I was hooked, what a great program! So since then I've been watching the show here and there. When I have half an hour to relax or just want to watch a great but 'reasonable in time' TV cooking program.

 
But I never totally adopt a recipe, even the given and stolen ones. Because when Alton Brown shows us how to make this great tofu, he breads the tofu in eggs and flour. In my opinion breading is old fashioned or American. I remember the parents of my childhood friends breading every piece of meat that they will serve me. And I don't know why, but always when I'm in a American restaurant I get a breaded piece of meat. Or maybe I should go to some other restaurants except the Cheesecake factory (I mostly go there for the dessert, of course....)

1 block of firm tofu
Paper towels
Soysauce
Optional: ketjap manis
Sunflower or canola oil

Get the tofu out and dab it dry. Slice in 1 cm thick slices. Place them next to each other on a paper towel, now placing another paper towel over it and press down carefully. Place the tofu in a deep plate or tin. Now you can use only the soysauce or you can go 50 / 50 on the soy and ketjap. The ketjap will make it a bit sweeter. Poor over the sauce until it at least is half covered. Let is marinade for a minimum of 15-30 minutes. The longer it can marinade, the more flavor it gets. Now turn around and let it marinade for 15-30 minutes again. Get the tofu out, placing it next to each other on a paper towel, placing another paper towel over it and press down carefully. This is just to get the excess sauce of and to fry it more easily.


Get a non-stick frying pan and pour in 1 cm of oil. Now fry of the slices of tofu, turn around when it's browning. When golden brown on both sides, take it out. Place them on a cooling rack lined with some paper towels, to adsorb the excess oil. For the best result, let the tofu cool down. It will stiffen up a little bit and is easier to get clean cuts. I like to eat it cold, thinly sliced or diced in salads. Our warmed up in stirfry's or as an alternative for meatballs in soups.

Hopefully these recipes gave you the courage to go out in the big world of tofu and give it a go. And my dad was right about one thing, when you make great tofu, people will be asking and talking about it! Enjoy! 

zondag 27 oktober 2013

One Carrot Cake, three Toppings

I'm a cake-eater. I will go crazy for cake and pie, but even more for baking them. Most of the time I start baking because I have some leftover ingredients from other recipes. Baking a strawberry rhubarb pie after making a rhubarb syrup. Making an apple strawberry crumble pie with some leftover strawberries. But there is only one cake that will never ask for a trip to the market, because all the ingredients I already have in my pantry, carrot cake. Because I make it so often I started playing around with the ingredients, adding more spices, leaving out others. Now I have a perfect recipe, but how to top it of? Of course you have the traditional cream cheese frosting. But after a while you want more. So I wrote down some of my ideas on topping of the old well-known carrot cake.


Carrot cake
140 ml of sunflower or canola oil
200 gr of dark caster sugar
2 eggs
300 gr of grated carrot
100 gr of nuts, like walnuts, pecans, hazelnuts, almonds, chopped or whole
1 tablespoon of baking powder
1 tablespoon of cinnamon
1 teaspoon of nutmeg
2-3 tablespoons of desiccated coconut
175 gr of selfraising flour
Pinch of salt

Heat the oven to 150 C/ 300 F. Mix together the oil, sugar and eggs until a fluffy like mixture. Fold in the carrot, nuts, spices, baking powder and coconut. Sieve the flour over the mixture, add a pinch of salt and fold together. Grease a baking tin or line with baking paper. I used a 30cm x 30cm square tin, but a round 22 cm-24cm tin will also be fine. Now pour the mixture into the tin and place in the middle of the preheated oven. Bake the carrot cake for 1 hour. Then let it rest in the tin for at least an hour.

Chocolate covered Carrot cake
The first time I came around a recipe for chocolate on carrot cake I was very disappointed.  The recipe asked for a pre-made chocolate icing. It gave me the chills. Around a year ago, one of my brothers friends had a birthday cake covered with pre-made pink chocolate icing. I refused to eat it then, mostly because of the artificial color. So why should I use it myself? Stubborn as I am, I just used chocolate.


Note: Because the chocolate becomes hard again you can have a different carrot cake experience. Normally the topping will make sure you have something to make the cake taste even more moist. If you find the chocolate covered carrot cake to dry there is just one solution. My little brother came up with the idea of serving the carrot cake with some vanilla ice cream. I have to say, my little brother is a champ in tastes and yummy goodness so I would take his advice!

100 gr of dark chocolate
50 gr of white chocolate

When the carrot cake is still cooling down you can start on melting the chocolate. I always melt it au bain-marie. Au bain-marie is just a bowl covering a pan with boiling or boiled water. In that way the chocolate melts because of the heat from the steam. The chocolate is not directly on the heat, so there is no chance of burning. Make sure the bottom of the bowl doesn't hit the water. You can also melt the chocolate with the microwave. The trick to melting chocolate is giving it a hand by chopping it in smaller bits. And always keep an eye on the chocolate.

So chop up your chocolate. Melt the dark and white chocolate au bain-marie or in the microwave. When its all melted just pour the dark chocolate over the cake and using a warm spoon cover the cake. Using a spoon and dip it in the white chocolate and move from the top to the bottom in a swift move, splashing a stripe of white chocolate on the dark chocolate. Do this until you finished the white chocolate, all in the same order. Now using a knife, make lines in the opposite order then the white chocolate. This will create a beautiful pattern. Let the chocolate set, for around an hour. 

Tofu cream cheese for frosting
My biggest problem with cream cheese is fat. If the cream cheese isn't fat enough, the recipes always ask for 1 part of cream cheese and 1 part of butter. So adding on to your lovely carrot cake, extra fat and fat! Although the sugary delight tastes fine with the fist bite, after the second bite of the thick layer of frosting you had enough.

Adding to the equation that one of my friends has a dairy allergy. So cream cheese and butter are out of the question. So I started looking for a vegan recipe to make cream cheese. Combining different recipes and trying out for taste, I came up with this one.


Note: To make one thing very clear, this will never taste exactly like cream cheese. There is almost no fat in this tofu cream cheese, that will normally gives you the substance and taste of regular cream cheese frosting. This tofu cream cheese has a more yogurt-like taste and a substance of a thick yogurt. So very low in fat, but high in flavor, this tofu cream cheese frosting is a perfect alternative for those conscious eaters.

1 package of silken tofu
2 teaspoons of coconut oil
1/4 cup of peeled almonds or cashews
1 tablespoon of non-dairy milk, like coconutmilk, almondmilk, soymilk
1 teaspoon of salt
1-2 tablespoons of lime juice
3 tablespoons of sweetner or sugar, like coconut blossom sugar
Optional: flowers for decoration, I used flowers from my mom's herb garden. Like the borage starflower, flowers of oregano and lavender. 

Put the tofu, coconut oil, nuts, milk and salt into a blender. Blend for 2-3 minutes. Taste the mixture and add the lime juice and sugar to taste. You can choose to add more or less of the lime and sugar. 
Put in a container and cover, let it set in the fridge for at least an hour. After setting use a spoon to cover the cake. If you have some edible flowers you can decorate your cake. 

Cream cheese frosting with a twist
I may not like it, but maybe you do. And in the last year I made a lot of cream cheese frosting. So this is for you cream cheese lovers out there.


150 gr of cream cheese
100 gr of butter
150 gr of icing sugar
1 lime
Optional: chopped or whole walnuts for decoration and crunch

Mix together the cream cheese and butter until a smooth mixture. Fold in the icing sugar. Now taste. If you like it like this, you're finished. But if you want a twist use the lime. With a fine grater, grate of the green skin and add to the mixture. Also adding some the juice of the lime. How much? That's to your taste, so add bit by bit till you like it. Sprinkle the chopped walnuts around the edge of the cake or place whole walnuts around the edge.

So there you have it, three ways of topping of your carrot cake. Try them out and enjoy! 

DIY springroll-rollfeast II, the dipping sauces

If you thought the banh trang on its own was delicious, wait till you try dipping them. You can buy all different kinds of sauces in the store. I'm a big sucker for a good spicy sweet chili sauce and let's be honest, who isn't? But you can also play with the sauces and make them even more yummy.

Nouc mam cham vietnamese fishsauce
Nouc mam cham is the traditional sauce for banh trang, the sauce has to be a perfect balance between sweet, sour, salty and spicy.


Unfortunately for all you vegetarians out there who also don't eat fish, this is a no go for you. But don't be to sad, my chinese grandmother is also a vegetarian and I know that she and my aunt always make a vegetarian version of this sauce. Until now I didn't got my hands on it, but I will be visiting them for the holidays and will ask for the recipe. So you have to stayed tuned, have a little bit of patients, the moment I get my hands on it, it will be here!

1/2-1 cup of sugar
1 cup of water
1 cup of vinegar
1 cup of fish sauce
1 big chilli
2 cloves of garlic

Mix the sugar with the water, until the sugar is dissolved. Then add the vinegar, stir, add the fish sauce and stir again. Chop up the chilli and garlic as small as possible. Pop these in the mixture and whisk away. Taste and see if the flavors are balanced.

Nouc Tuong Ngot Hoisin-Peanut sauce
When I was in San Fransico, visiting my cousin and her family, she would get me ready and rolled banh trang, also known as 'Nems'. My favorite nem was filled with lettuce, rice noodles, pork, prawns and beautiful herbs. On the side there was always a small cup filled with this thick dark luscious sauce.

Once I got back to Los Angeles my other cousin explained the compontents of the sauce. Then I suddenly remembered that I had it before. When I was in my late teens I was visiting my aunt and uncle in Paris, I helped my aunt make this sort of nems. When we were setting the table everybody got a runny thin dark sauce and a hand of salted peanuts. She explained to me that normally you would chop them up and put them in the sauce, but for now we would just add then to our bites.


So when I got back home I was confused. I liked both the thick sauce I had in SF, but also liked the thin sauce I had in Paris. So after trying for many many times I found out the secret; peanut butter.

4 tablespoons of hoisin sauce
2 tablespoons of peanut butter, for more crunch use a peanut butter with chunks
1/2 cup of water
Optinal: whole of chopped peanuts

Put all the ingredients in a small saucepan. Put on low heat and stir until well combined.
Taste, add more peanut butter if you like it more nuttier. Add more hoisin if you think the peanut is to strong. Sounds easy, right? Well it is, but from now on you can go thick or thin. Add more water if you want a thinner sauce or let the sauce thicken for a thicker sauce. If you would prefer some crunch, you can always add some whole or chopped peanuts or use a chunky peanut butter.

Chilli sauce
On this I have to say I'm lazy, for years and years I have the same brand of chillisauce and don't care to make it myself. So I would say, get that old bottle of chilli sauce you still have somewhere in the back of your pantry or buy one in the store and just enjoy! 

zaterdag 26 oktober 2013

'Pickled veggies' according to Mom and Mai

For English scroll down
Ik herinner me nog goed. Elke keer als mijn moeder zoetzuur maakte dan rook de hele keuken naar azijn, toen vond ik het altijd verschikkelijk misselijkmakend. Alsof dat niet erg genoeg was, het moest volgens mijn moeder zeker een dag intrekken in de koelkast. Dus als je de koelkast open deed kwam er een walm van deze verschikking je tegenmoet. Eraan terugdenkend heeft het te maken met een slechte combinatie van geur en herinnering, die in relatie tot een foodblog niet erg smakelijk is, dus deze jullie maar bespaar.

Sinds de afgelopen maanden maak ik steeds vaker zelf zoetzuur. De eerste keer nog braaf mijn, volgens mijn moeders recept. Al snel smaakte het naar meer en kwam ik achter de eindeloze mogelijkheden van het maken van zoetzuur. 


 Toen ik nog op de kunstacademie zat deed ik veel beeldend onderzoek naar het verschil tussen de westerse en oosterse keuken. Ik kwam erachter dat bijvoorbeeld een rasp, een ander uiterlijk had aan de andere kant van de wereld. Al bleef de gebruiksfunctie hetzelfde. Deze spread is afkomstig uit een zelfgemaakt boek over de keuken, waarin ingredienten en gereedschappen van oost en west naast elkaar gezet worden, gekoppelt aan een recept en aandacht wordt besteed aan de herkomst en gebruik van deze aan beide kanten van de wereld.
Note: vergroot de afbeelding en lees het Nederlandse recept.
---
When I was still in art school I did a visible research about the differences between the western and eastern kitchen. I discovered that for example a grater has a different appearance on the other side of the world. Although the function remained the same. This spread is from a selfmade book about the kitchen, in this book I place ingredients en tools from east and west next to each other, try to pair it up with a recipe and researching the origin of these on both sides of the world.


I remember it well. Every time my mom made pickled veggies the whole kitchen would smell like vinegar. I always thought the smell was disgustingly noxious. To make matters worse, my mom always said it needed to age in the fridge. So every time when you opened the fridge the stench will come floating ate you. Now looking back, it was a bad combination of smell and memory, a memory that is relation to a foodblog is not really pleasant, so I will spare you all.


At home we would eat the sweet sour pickled vegetables with mostly vietnamese meals. In south east Asia this pickled veggies are a big part of the meal. Always as a little freshness and crispness to go along with your meal. During my workdays in Chongqing I would go to the canteen to eat lunch with my colleagues. We would go to the second floor, where they serve food that was a bit more expansive than downstairs, but will make up for it in taste. I was hooked on this one dish and every friday (or sometimes also on tuesday, wednesday or thursday) I let my Chinese colleague order it for me. When When it was ready my order would me called out. Picking up the tray with food, the cook on the other side of the counter would point at a big bowl. The bowl was always filled with a diced white vegetable, covered in red chillipowder and seeds. After asking my colleagues and trying the little dices, I found out this was the Chongqing way of making a spicy pickle. For me the taste wasn't all that. To much spice, not enough pickle.

Since a few months I've been making pickled veggies more and more. First just following my moms recipe. but very quickly I wanted more and discovered endless possibilities for making pickled veggies.

Moms pickled veggies
1 big carrot
1 daikon, also known as white radish
Sugar
Vinegar

Clean the veggies and grate them with a big grater. Make sure you have around the same amount of carrot versus daikon. Make a mixture of the same amount of sugar and vinegar (1 cup of sugar for 1 cup of vinager) and mix until the sugar is dissolved. If you think the mixture taste to strong, you can add water. Pour the mixture over the grated vegetables and leave it to soak for a few hours in the fridge. Drain and taste, you can rinse the vegetables to make the taste less out there.

Mai pickled veggies
The biggest difference is that the options are almost limitless! The use of more different vegetables is an option, there are different ways of cutting the vegetables, the tastes can be more complex and layered. I will give you my most basic recipe and show all the possible add-ons.


1 carrot
1 cucumber
optional veggies; cabbage, daikon, radishes,
green beans, chinese cabbage, fennel
a tumb size piece of fresh ginger
sugar
vinegar
water
optional seasoning; chilli, whole peppercorns, fennel seeds, mustard seeds

Peel the ginger and cut the ginger julliene. In a small saucepan, put together same amounts water and vinegar and half the amount of sugar with the julliened ginger. So the water vinegar sugar ratio is 2:2:1. Slowly heat and mix untill the sugar is dissolved, never letting it get to a boil and let it cool down a bit.

So here comes your first option, for some of the veggies it's better to blanch them. Veggies like the green beans, chinese cabbage and fennel are way more tastier if they're just not really raw anymore. If you use any of these veggies, clean them. Take the caps of the green beans, cut the chinese cabbage and fennel into thin straps and just put them in with the mixture. Let it warm for around 5 minutes.

In the meanwhile you can clean you other veggies and choose how to cut them. Do you want everything julliened, or maybe grated, or in bigger chunks. I suggest to stay with one kind of cutting, otherwise the end product can look confusing.

Getting to the assembly, make sure you have a container that can hold all the veggies and pickle mixture. Now layer up the different veggies. If you want you can add seasonings, like sliced and maybe deseeded chilli, whole peppercorns or fennel or mustard seeds. Pour over the slightly cooled down mixture. Let it come to room temperature, then cover and put in the fridge till use. I would say at least an hour, but the longer it sits, the stronger the flavors get.


Mai cucumber pickle from Chongqing
In Chongqing I would go to this small dumpling place. As a contrast to the soft and warm dumplings I would order this cucumber. 

1 cucumber
2 gloves of garlic, chopped
1/2 a cup of vinegar
3 table spoons of sugar
1 teaspoon of salt
Optional: 1/2 a chili, chopped or a teaspoon of Szechuan pepper.

Clean and cut the cucumber in to 2cm long strips.  Dissolve the sugar and salt in the vinegar and add the garlic and chilli. Mix well and add the cucumber. Let it pickle for at least an hour.

Serve some up, on a sandwich, in a banh trang, to spice up the boring old green salad and enjoy! 

DIY springroll-rollfeast I, Bánh tráng basics


up: Rice paper shelf in Californian Asian market. Drawing of how to wrap a banh trang, from my artist book, 2012
down: A set table for a banh trang feast at my grandparents house. My dad explaining how to roll.
Both in 1990, before my birth.


Every big birthday or holiday at home was always celebrated with Banh Trang. A table filled with stir-fried veggies, different cuts of seasoned meats, rice noodles, herbs and lettuce, dipping sauces and rice paper wrapper. In a modern way you could say 'DIY springroll-rollfeast'.

The great thing about making this feast is that you can vary every time, when you roll a banh trang, but also when you are preparing the different components. I made it the traditional way that my parents always did, but also a fast and easy version for during the week, vegetarian versions, fish versions, vegan versions, raw versions, fruity versions, unprepared versions. The key is in a few elements. Having the rice wrapping papers, the banh trang, having rice noodles, having some raw veggies like lettuce or cucumber and having a dipping sauce. Just with these elements alone you can start off your wrapping and rolling.


Because of all the possibilities this post can be endless. So now for part 1 of the DIY springroll-rollfeast, just some basics to start you off. 

DIY Springroll-rollfeast, the basics
1 package of rice wrapping paper, you can find it in any asian market. There are different shapes and sizes, I would recommend the 22 cm round ones. The more advanced you get, the more you can experiment. 
50-75 grams of thin rice noodles, per person. 
1 lettuce or a package of baby leave lettuce or rocket, to your taste
1 cucumber 
Fresh herbs, like different mints, cilantro/coriander, thai basil

Prepare the rice noodles according to the package. Wash the lettuce and herbs, leaving the leaves whole. If the lettuce grain is to tough you can remove this. Cut the cucumber julienne, 6-8 cm long.
Now for the assembly. Fill a deep dish or bowl with hot water. Now put in the rice paper, turning it around in the water until everything got in touch with the water. Put on a plate and within a minute or so the paper becomes soft and roll-able. Now it will show if you are greedy or not, because you can start filling. Start with the lettuce, placing it just under the middle of the round paper. Now put on some rice noodles, some cucumber and if you like some herbs.

Note: Normally I will prepare more vegetables or dishes to give the springroll lots of flavor.  So normally I would say, fill up your lettuce leave with all the yummy goodness you can find on the table. Find inspiration and recipes in the still to come parts of DIY springroll-rollfeast. Like part III about vegetarian/vegan components to fill you banh trang.

We're at the point you need to wrap and roll your banh trang. Get the side that's at the bottom, closest to you, and bring it all the way over your filling. The paper will stick to itself very easily. When you covered your fillings, fold in the sides, make it tight. Don't worry, the paper is pretty strong. Now roll your package till the top of your plate. If you did it wright, the you will now have a rolled banh trang. 


Dip away in one of the sauces of part II of DIY springroll-rollfeast. And when you finished it, you can do it all over again! Mix up the flavors, mix up the sauce, the crunch, mix up the company you eat it with, but mostly, enjoy! 

vrijdag 25 oktober 2013

'Asian on the outside, European on the inside' Dumplings

I love dumplings, I want then fried, boil, steamed. Filled with beef, prawns, veggies. When I lived in Chongqing, China, I ate dumplingsoup (wontonsoup) for breakfast. Or went to the dumpling restaurant to have lunch. And then, when having dinner, there would always appear a big steaming platter of fresh made dumpling!

When I came back to Holland I missed my dumplings. I wanted to share my new found love with my friends. The only problem, almost all my friends are vegetarians. So I had a big dilemma, how to eat lovely dumplings with my lovely friends. Around that time beetroots just got in season, so my head was busy thinking about green salads with beetroots and goat cheese. And then the magic happened. How about filling the dumpling with root vegetables and cheese?! 'Asian on the outside, European on the inside' Dumplings where born. There not only delicious but also pretty on the eyes. On the outside you see a touch of pink, but when you bite in to one, the yummy red-pinkish filling becomes visible.


Deepfried 'Asian on the outside, European on the inside' Dumplings
1 package of wonton pastry, I use the deep fry square wonton pastry
1 big or 2 small beetroots
1 small sweet potato, or purple yam
1 carrot
125 grams of soft goat cheese or 125 grams of sheep goat feta
pepper and salt

Take the wonton pastry out of the freezer and let it defrost to room temperature. Preheat the oven to 200°C/ 400 °F. Wash the vegetables, leaving the skin on. If the vegetables are big you can cut them in half. Put them in a baking tray and drizzle some oil. Pop them in the oven for 30-45 minutes, check if the vegetables are done by checking the softness with a fork. Let the vegetables cool down, so they're easier to work with. When manageable, peel the vegetables. Now you can choose to mash all of them or leaving some beetroot aside for some bite. Mash them with a fork, if you want cut some of the beetroots in small tiny cubes and add to the mashed mixture.
Crumble in the cheese and taste. Use salt an pepper to your liking.

Filling the dumplings is a important task. You need to fill the dumpling and seal it, otherwise all the yummy fillings will burst out while frying. Giving a big mess and probably nasty burnmarks and tears. Make a small filling station, get all your ingredients, a teaspoon, a little bowl of water, a sheet or plate for the finished dumplings. Now start filling, take one wrapper and lay it in the palm of your non-writing hand. Scope a teaspoon of filling in the middle of the wrapper. Wet your indexfinger and swipe two sides of the wrapper. Fold the wrapper into a triangle, the wet sides on the dry sides. push them together and wave the rest a bit together. So you get a wavy effect, like you can see in the picture.

To fry the dumplings I just use a pan with sunflower oil. But a deepfryer will work the same. If you use a pan, fill that pan with around 500 ml of oil. turn on high heat and keep an eye on the oil. The moment it looks like strings are dancing inside the oil it's getting close to the right temperature.
Using the deepfryer, preheat the deepfryer to 180°C/ 350 °F.
Now it's time to fry! Let the dumplings slide into the oil, filling down and sliding away from you, so if it slashes you won't get burned. Keep an eye on the dumplings, they need to become golden brown and crispy, it will take only a few minutes. Because the filling is already cooked, it's only about making sure the wrapper pasty is crisp and cooked.

Let the fried dumplings leak in a collander with papertowels to get rid of excess oil.
Serve hot and crispy, with sweet chili sauce or Vietnamese Nouc Mam Cham (recipe will be there soon!). But most importantly, enjoy with good friends!

Going bananas for oatmeal cookies

I don't really have a sweet tooth but once in a while I will go crazy for cookies and chocolate. A few months ago I started to see if I could bake more consciously. Less sugar, less fat, but still all the yummy goodness. I found a great website (chocolatecoveredkatie.com) where you can find all the lovely 'healthy' desserts and treats you want!


Ever since I visited my family in Callie in the summer of 2012 I'm hooked on oatmeal cookies. But I never had the guts to try it myself. I remember the sweet sugary tasty delights I ate during my months in CA. After browsing for good recipes and a sugar level I was ok with I made the first batch. Tweaking and trying the recipes till it became just what I wanted:

Oatmeal cookies going bananas
1 cup of rolled oats
2 bananas
1/2 cup of solid coconut oil
a pinch of salt
2 tablespoons of grated coconut
2/3 cup of chopped pure dark chocolate
2/3 cup of chopped up dried fruits, like cranberries, pineapple, mango, dates
2/3 cup of chopped nuts, like walnuts, almonds, hazelnuts, pecans

Heat the oven to 180 °C/ 350 °F. Grease a baking sheet or cover with baking paper.
Mash together the bananas and coconut oil, then add all the other ingredients and mix till well combined. Now you can roll into little balls and push down on the baking sheet, the thinner you make them, the crunchier they get! Or you can smear the whole 'batter' on the sheet and after baking cutting it into bite size pieces or bars.
Bake for around 15-20 minutes, until the top gets golden brown. Let it cool for 10 minutes before removing from the sheet. If you want the bottom to also be crispy you can bake the cookies a second time, upside down for 10 minutes. Keep a close eye, they can now burn easily.


Note: The cookies will always stay a little chewy and moist, because of the banana.
And you can always adjust the measurements of the add-ons, so if you don't like nuts you can use more chocolate. If you want more sugar add some, but mostly, enjoy!

donderdag 24 oktober 2013

Welcome to Mai Food

Hi all food lovers,
Here it is, my first steps out in the big wide world of blogging. For many years I've been cooking and baking away in all my tiny kitchens all over the world. Food has always been a big part of my upbringing.

My dad, being a Vietnamese born Chinese brought his home cooking to Holland. My mom, a Dutch tall vital woman always baked dutch apple pies and cakes for birthdays and parties. So growing up I was surrounded by the smell and taste of Vietnam and Southern China with a hint of cinnamon and apples on the go.  Since I was little I would help out in the kitchen, helping my mom make pastry for the apple pie, helping my dad cut the veggies. I remember how friends, acquaintances and neighbors made remarks on how my childhood home smelled like yasmin scented rice.

Now I'm in my begin twenties, graduated art school and since then I'm traveling east and west. Visiting family in California, working abroad in China and enjoying the lovely foods and culture from all over the world. Inspiring me to learn how to cook, how to be a better cook and giving back beautiful food to my family and friends.

With this blog I want to share my recipes and ideas with all of you. To show that even in Holland, you can make drawn good (mostly Asian inspired) food and be healthy.

Enjoy!