After last weeks rhubarb pie I was totally in the rhubarb zone. So without thinking I bought more rhubarb, I thought that I could use my free weekend to bake something delicious. But of course, my free weekend turned into this huge social feast, so no time for baking and the rhubarb ended up in the back of the fridge.
Storm was coming, monday night. Great time to stay inside and get busy around the kitchen. My beautiful rhubarb was starting to turn bad, time to make something. I wasn't in a baking mood, didn't wanted to make rhubarb lemonade again, so time for something new! Last summer I visited a friend in France. I always buy BonneMaman confitures over there, to bring home for my grandparents. Last summer I bought a rhubarb one for myself, within days after opening the jar I emptied it out. My next visit to France is still unclear, but my craving was still growing. Time to make my own!
Rhubarb Strawberry Confiture source
500-750 grams of rhubarb
500 grams of strawberries
50 ml of orange juice
500 grams of confiture sugar
4-6 jars
2 tablespoons of cleaning soda
note: For a confiture you need a 2kg of fruit to 1 kg of sugar ratio. This differs from jam, what is more of a 1kg of fruit to 1 kg of sugar.
To keep and store the confiture for a longer time you need clean, very clean jars to pour the confiture in. You can clean jars and lids by boiling them in water with the cleaning soda for around 10-15 minutes. Afterwards rinse well with hot water and wipe clean. Put the jars heads down on a tablecloth until filling.
Clean the strawberries and rhubarb. Cut the rhubarb in pieces around 1 cm, put in a big saucepan with the orange juice and let it simmer for 10 minutes, lid on top. Cut the strawberries into small pieces and add these with the sugar to the rhubarb. Mix well until the sugar is dissolved. Bring it back to a boil, let it cook for 3 minutes.
Pour the confiture into the jars, lid and turn upside down. Turn around after 5 minutes, if necessary clean outside of the jars. Let it cool down and store in a dark cool place. Enjoy with toast or in your yogurt.
Spring is here! The first stalks of rhubarb are hitting the counters of my local greengrocer! Last year I found this great lemonade recipe with rhubarb. But it asked for tons of sugar and after extracting the juice the rhubarb ended up in the trash. Such a waste! After many tries I perfected a new lemonade recipe, with great tang, more fruit and less sugar. And a great way to use the rhubarb pulp that's leftover afterwards, it's a perfect base for a great pie or crumble.
Last years rhubarb crumble pie
Mai Rhubarb Strawberry Lemonade
for 1 liter bottle of lemonade
3 stalks/250 grams of dark rhubarb
200 grams of strawberries, fresh ones are great, frozen is also possible
Lime
Honey (or sugar, up to you)
Club soda
optional: some extra strawberries for serving
Clean and cut the rhubarb and strawberries. On low-medium heat let them simmer with a splash of water for around 10 minutes. Prepare a bowl with a cheesecloth or some other piece of fabric that will let the juices thru and the pulp inside. Tie the cloth up and hang above the bowl. Give it some hours to let all the juice thru. Or get your hand dirty! With CLEAN hands you can squeeze the juices out. Keep the pulp, you'll need it for the crumble recipe!
Put the juice in a little pot and add a squeeze of lime and a spoon of honey (or sugar) to start. Heat it up until it is mixed in well, no boiling! Try and add more honey to taste. Let it cool down. Add fresh cut strawberries and club soda when serving, to maintain the bubbles.
note: For an extra spark you can add some rum or vodka, or replace the club soda with sparkling wine.
I don't like to waste my food. So after making my lemonade I always wonder what to do with the rhubarb/strawberry pulp. I made a lot of different pie recipes, with apples, nuts and crumbles. Here is my fave!
note: If you didn't make any rhubarb lemonade, you can just use fresh rhubarb
Mai Rhubard Crumble Pie for the crust
250 grams of sifted flour
pinch of salt
125 grams of butter, room temp
125 grams of (cane)sugar
1 egg
for the rhubarb compote filling
Use the pulp from the lemonade recipe and add +- 500 grams of rhubarb
Juice of a orange
100 grams of (cane)sugar
for the crumble
70 grams of flour
70 grams of old fashion rolled oats
70 grams of chopped mixed nuts
70 grams of (cane)sugar
70 grams of cold butter
note: Not a nut person, shame on you! But you can easily leave the nuts out.
Last years old fashioned rhubarb apple pie
Preheat the over to 180 C. Start by making the crust. Mix the flour, salt and butter, pinch the butter between your fingers until you get a crumble mixture. Add the sugar and add and make it in to a consistent dough. Let the crust dough set for 20 minutes in the fridge.
In the meanwhile you can make the rhubarb compote and crumble. Clean and chop the rhubarb and let it simmer with the orange juice and sugar for around 12 minutes. For the crumble, mix the flour and butter, pinch the butter between your fingers for a crumble mixture. Add the nuts, sugar and oats and mix well.
Take the crust dough from the fridge and put it in a greased baking tin. Even it out so it's the same thickness. Using a fork make some wholes in the dough and bake for 15 minutes. After the 15 minutes, take out the tin and reset your oven to 200 C.
Last weeks Mai Rhubarb Crumble Pie, cooling down outside
Pour over the rhubarb filling and even out. Top with the crumble and put it back in the oven for 20 minutes. The crumble should have a good nice baked color. Let it rest for some time, so the rhubarb juices can set. For some extra detail you can add some powdered sugar, in a design or just randomly.
Best when still a little warm! Enjoy!
Spring is in the air. The temperature is rising, sunglasses and ice cream on every street corner. Time to say goodbye to the heart warming meals, hello fresh and light meals!
When I visited my aunt and uncle in the south sea province of Holland, I looked through the many cookbooks they have. My uncle made this great green bean salad, with lemonzest and sesame seeds, inspired by Ottolenghi. Guess it's a family thing, never really adopting recipes from cookbooks. So this 'Spring Salad' as Ottolenghi calls it, was once the starting point. But is now long gone!
Sesame Spring Salad with Tofu source: Ottolenghi's Spring Salad
1 recipe of Mai's secret to tofu success scroll down to see the recipe or click here for the post about tofu.
1lbs/500 grams of fresh green beans
2-3 tablespoons of (black/white) sesame seeds
2-3 tablespoons of sesame oil
1-2 tablespoons of soysauce
1 tablespoon of rice vinegar
seasoning
Optional: Other fresh greens, like asparagus, peas, carrot, rocket, watercress or other leafy salads.
Start with the tofu. Mai secret to tofu success 1 block of firm tofu Paper towels Soysauce Optional: ketjap manis Sunflower or canola oil Get
the tofu out and dab it dry. Slice in 1 cm thick slices.
Place them next to each other on a paper towel, now placing another
paper towel over it and press down carefully. Place the tofu in a deep
plate or tin. Now you can use only the soysauce or you can go 50 / 50 on
the soy and ketjap. The ketjap will make it a bit sweeter. Poor over
the sauce until it at least is half covered. Let is marinade for a
minimum of 15-30 minutes. The longer it can marinade, the more flavor it
gets. Now turn around and let it marinade for 15-30 minutes again. Get
the tofu out, placing it next to each other on a paper towel, placing
another
paper towel over it and press down carefully. This is just to get the
excess sauce of and to fry it more easily.
Get
a non-stick frying pan and pour in 1 cm of oil. Now fry of the slices
of tofu,
turn around when it's browning. When golden brown on both sides, take it
out. Place them on a cooling rack lined with some paper towels, to
adsorb the excess oil. For the best result, let the tofu cool down. It
will stiffen up a little bit and is easier to get clean cuts.
Clean and wash the green beans (and other vegetables). Blanch the beans and other veggies for 5 minutes. Try if the beans are cooked but still a little crispy and bright green. Drain and set aside to cool down. Heat a skillet and toast the sesame seeds. Keep a close eye, you don't want the seeds to burn.
When the tofu is cooled down you can slice it and assemble the salad. Mix the beans (with the other vegetables), add the vinegar, soysauce and sesame oil. Season well and add the sesame seeds, mix well and taste. Add more to taste. Mix in the tofu and your spring salad is finished!
Napa cabbage, or in Holland better known as Chinese cabbage. As a kid we would eat it a lot at home, as the main ingredient for a chinese stew 'Lion's head'. It was more like a stew kinda soup form napa cabbage with meatballs. I always figured that the meatballs are probably the lion heads. The name of the dish is a direct translation from the Chinese name for the dish.
Normally if we had napa cabbage at home, we would eat Lion's head. After the many and many years of eating this dish, I got bored with the flavor and texture of the cabbage. I always thought it was such a shame. Because the cabbage is easy to get by, cheap and versatile. In the last months I've tried many different ways of using and preparing these huge white chinese cabbage.
My cousin in LA made it with rehydrated dried shrimps and fish sauce. I tried slicing it thinly and adding it to soups and salads. A few days ago I came across an article about Chinese vegetables. They we're talking about Bok Choy and the versatility. There was this great picture of grilled Bok Choy. It never occured to me to grill a cabbage! So I figured giving the napa cabbage a try. It surprised me! The smokiness the grilling gives the cabbage is the best addition.
Grilled Napa Cabbage inspiration (in Dutch)
2 tablespoons of soysauce
2-3 tablespoons of sesameoil
seasoning
1/2-1 napa cabbage, this depends on size and mouths to feed.
For our family of 5 I use 1/2 of a large napa cabbage.
Cut the cabbage lengthwise. Make sure the bottom is clean. Now cut it into 3 or 4 wedges, trying to keep the stem intact. This will keep all the leaves together and makes it easier to handle. If necessary rinse the leaves and dry off. Heat a grillpan on the stove, on high heat until it starts to smoke lightly. Sprinkle the sesame oil on the cabbage and put the cabbage in the pan. After a minute or 4 turn, keep repeating until all the sides are grilled. The cabbage will turn from white and solid to glassy and soft. Then you know the cabbage is done. Sprinkle over the soysauce and season well. Mix together and let it sit for 5 minutes.
Now you can leave it like this, let everybody cut their own piece. Or just chop it up into bit size pieces. Your cabbage, your choice! This napa cabbage recipe is a great vegetable dish, enjoy with rice and other yumminess!
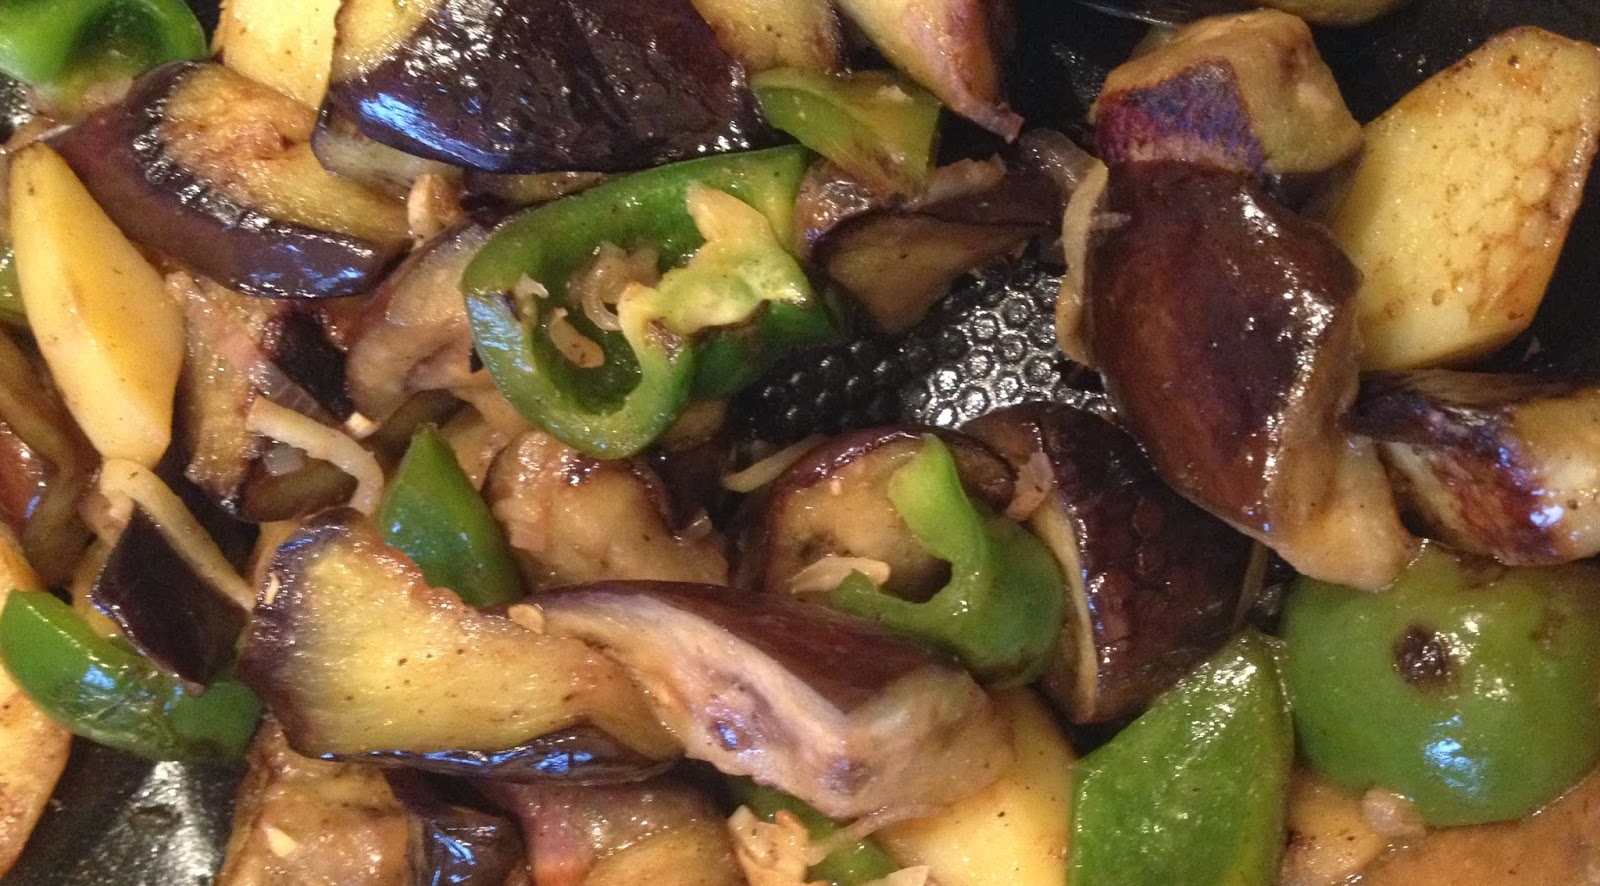
I always loved lasagna! The preps, the layering and the half hour relaxing while its doing it's thing in the oven. Some years ago most of my friends became vegetarians. One followed the other en before I knew it, I was left all alone in the omnivore world.
One of my friends once made me a veggie lasagna and I loved it. Since then I've been making the same lasagna. Even my mom makes it now. Somehow by grilling the vegetables, the lasagna gets a 'meaty' texture, that you forget you're eating vegetarian.
Vegetable Lasagna source
1 zuchinni
1 eggplant
Olive oil
2 teaspoons of dried Italian herbs (or something like it)
1-2 cloves of garlic, chopped
2 Onions, chopped
2 cans of chopped tomatoes
Around 300 grams of spinach
Lasagna sheets
Seasoning
2 bulbs of Mozzarella
Around 200 grams of grated cheese note: If you would like to have a vegan lasagna, just replace the cheese for vegan cheese or leave it out.
Friends coming over for dinner. Lasagna and summer salads in the garden, Houten, Holland, summer 2013
Preheat the over to 190C. Cut the zuchinni and eggplant lengthwise in thin slices. Make a marinade for the vegetables. Use around 5 tablespoons of oil, mix with the garlic and herbs. Now grill the vegetables, brushing them with the marinade you just made and season well.
You can grill by using a grill pan or the oven. Depends on what you prefer, I always use the pan, but most people think the oven is easier. In the oven it should take around 6-8 minutes.
Now sweat the onions, add the tomatoes and the juice, season well. Let it simmer for around 10 minutes. Heat a skillet with oil and cook the spinach. Set aside in a colander to get rid of the excess water and moisture coming from the spinach.
Cover the bottom of the oven tray with the tomato sauce. Cover with lasagna sheets. Layer the spinach, zucchini and eggplant and top with mozzarella. Now repeat until done. Make sure that your last layer is tomato sauce and cheese. Put in the oven for 30 minutes.
When done let it rest for around 5 minutes before serving. Enjoy!
*In Dutch I always say this sentence when I lost the big picture. Normally you'd say 'Ik kan het niet meer overzien', but the pronounciation of 'overzien' and 'aubergine' is somewhat similar.
The Aubergine is known by many names. Melongene, Garden Egg, Guinea squash, but mostly known as Eggplant. Although the Dutch name is aubergine, I will refer to it as Eggplant from now on. Eggplant, always thought it was the strangest name for a fruitvegetable. Breaking down the word to egg and plant doesn't help much. It doesn't look like an egg and isn't a plant but the fruit of a plant. After some websurfing I found some answers.
"The name of eggplant was given it by Europeans in the middle of
the eighteenth century because the variety they knew had fruits that
were the shape and size of goose eggs. That variety also had fruits that
are a whitish or yellowish color rather than the wine purple that is
more familiar to us nowadays. So the sort they knew really did look as
though it had fruits like eggs." -source
Now a days the eggplant looks probably way different then in the 18th century. This fruit, that we eat as a vegetable is a species of the Nightshade family. Making the tomato and potato his siblings.
The eggplant is native to Asia. So no wonder that my mom and dad used eggplant for a Chinese stew dish. I always liked the taste, but the texture and look of it made me think of slugs. Turning the eggplant in one of my least favorite vegetables.
Since I started cooking, I only used eggplant for non-Asian dishes. I started to use it we've been eating more and more Mediterranean. Giving it a different taste, texture and visually better then my memories.
Chinese Eggplant, Thais Eggplant, Indian Eggplant
sketch from Artist Book #2 USA, august 2012
In the summer of 2012 I rediscovered the eggplant for Chinese dishes. I was in one of my favorite restaurants in Los Angeles County. The food is so good, that I dreamed about it since my previous visit 4 years before. Together with my friend and cousin we picked Eggplant with Shrimp Schezuan**style.Since the moment I tasted it, I was sold. Now I dream about this dish. **Talking about Schezuan/Szechwan/Szechuan/Sichuan, this can refer to a province in China or the Schezuan pepper, also known as the numbing pepper. Although they use the Schezuan pepper a lot in the Schezuan province cuisine. For half a year I lived in China, in the neighborprovince of Schezuan (Chongqing was originally part of Schezuan, but became his own province), making the numbing pepper a big part of the Chongqing cuisine. What I even find more interesting is that I've seen many different spellings for this province since then. Szechwan, Szechuan, Schezuan, for me the right spelling is in pinyin Sichuan. 四川, translation: 4 rivers, pointing to the 4 rivers that go through the original (Sichuan & Chongqing) province.
In China I ate a lot of eggplant, Sichuan** style or somewhat different. But it never tasted the same as the one from Top Island Restaurant. Now back in Holland, with the taste of my Eggplant with Shrimp Schezuan style still fresh from last January, I started looking for a similar recipe. After some websurfing and nosing about in my Chinese/Asian cookbooks, I somewhat reconstructed my favorite eggplant dish.
Indian Eggplant, Chinese Eggplant, Thai Eggplant
from the Hawaii Market, San Gabriel, Los Angeles County
Eggplant Sichuan style vegan source & The Land of the Five Flavors by T.O. Höllmann & The Chinese Vegan Kitchen by D. Klein
In Holland it's hard and expensive to buy Chinese Eggplants, so I always use the regular eggplants from the store. But If you come across some Chinese Eggplants, affordable and good looking, why not?
3 Eggplants
2 Green Onions, sliced
3 cm of fresh Ginger, cut julienne
3 cloves of Gralic, minced
1 Chile, sliced and preferably deseeded
1/2 cup of vegetable broth
3 tablespoons of Soy Sauce
1 tablespoon of Sugar
1 tablespoon of rice vingar
1 tablespoon of cornstarch
Oil
Sesame oil
Seasoning
Optional for granish: toasted Sesame seeds, Thai basil, Cilantro
Cut the eggplants in 1/2 lengthwise and then slice crosswise into wedges, bite size pieces. If using a regular eggplant you could salt the eggplant first. To get rid of the excess water. Place eggplant in a colander and sprinkle with salt. Toss it around so the salt is mixed in well. Let it drip for half an hour or so.
Heat
a wok or large skillet over medium-high flame and add the oils; tilt
the pan to coat all sides. When you see a slight smoke, add a layer of
eggplant, stir-fry until seared and sticky, about 3 minutes. Season with
salt and pepper. Remove the eggplant to a side platter and cook the
remaining eggplant in same manner, adding more oil, if needed.
After
all the eggplant is out of the pan, add the green onions, ginger,
garlic, and chile; stir-fry for a minute until fragrant. Add the broth.
In a small bowl, mix the soy sauce, vinegar, sugar, and cornstarch until
the sugar and cornstarch are dissolved. Pour the soy sauce mixture into
the wok and cook another minute, until the sauce has thickened. Put the
eggplant back in the pan, tossing quickly, until the sauce is absorbed. Garnish with sesame seeds, Thai basil, and cilantro and serve.
I love eating this with steamed rice, as a main or a side. Enjoy!
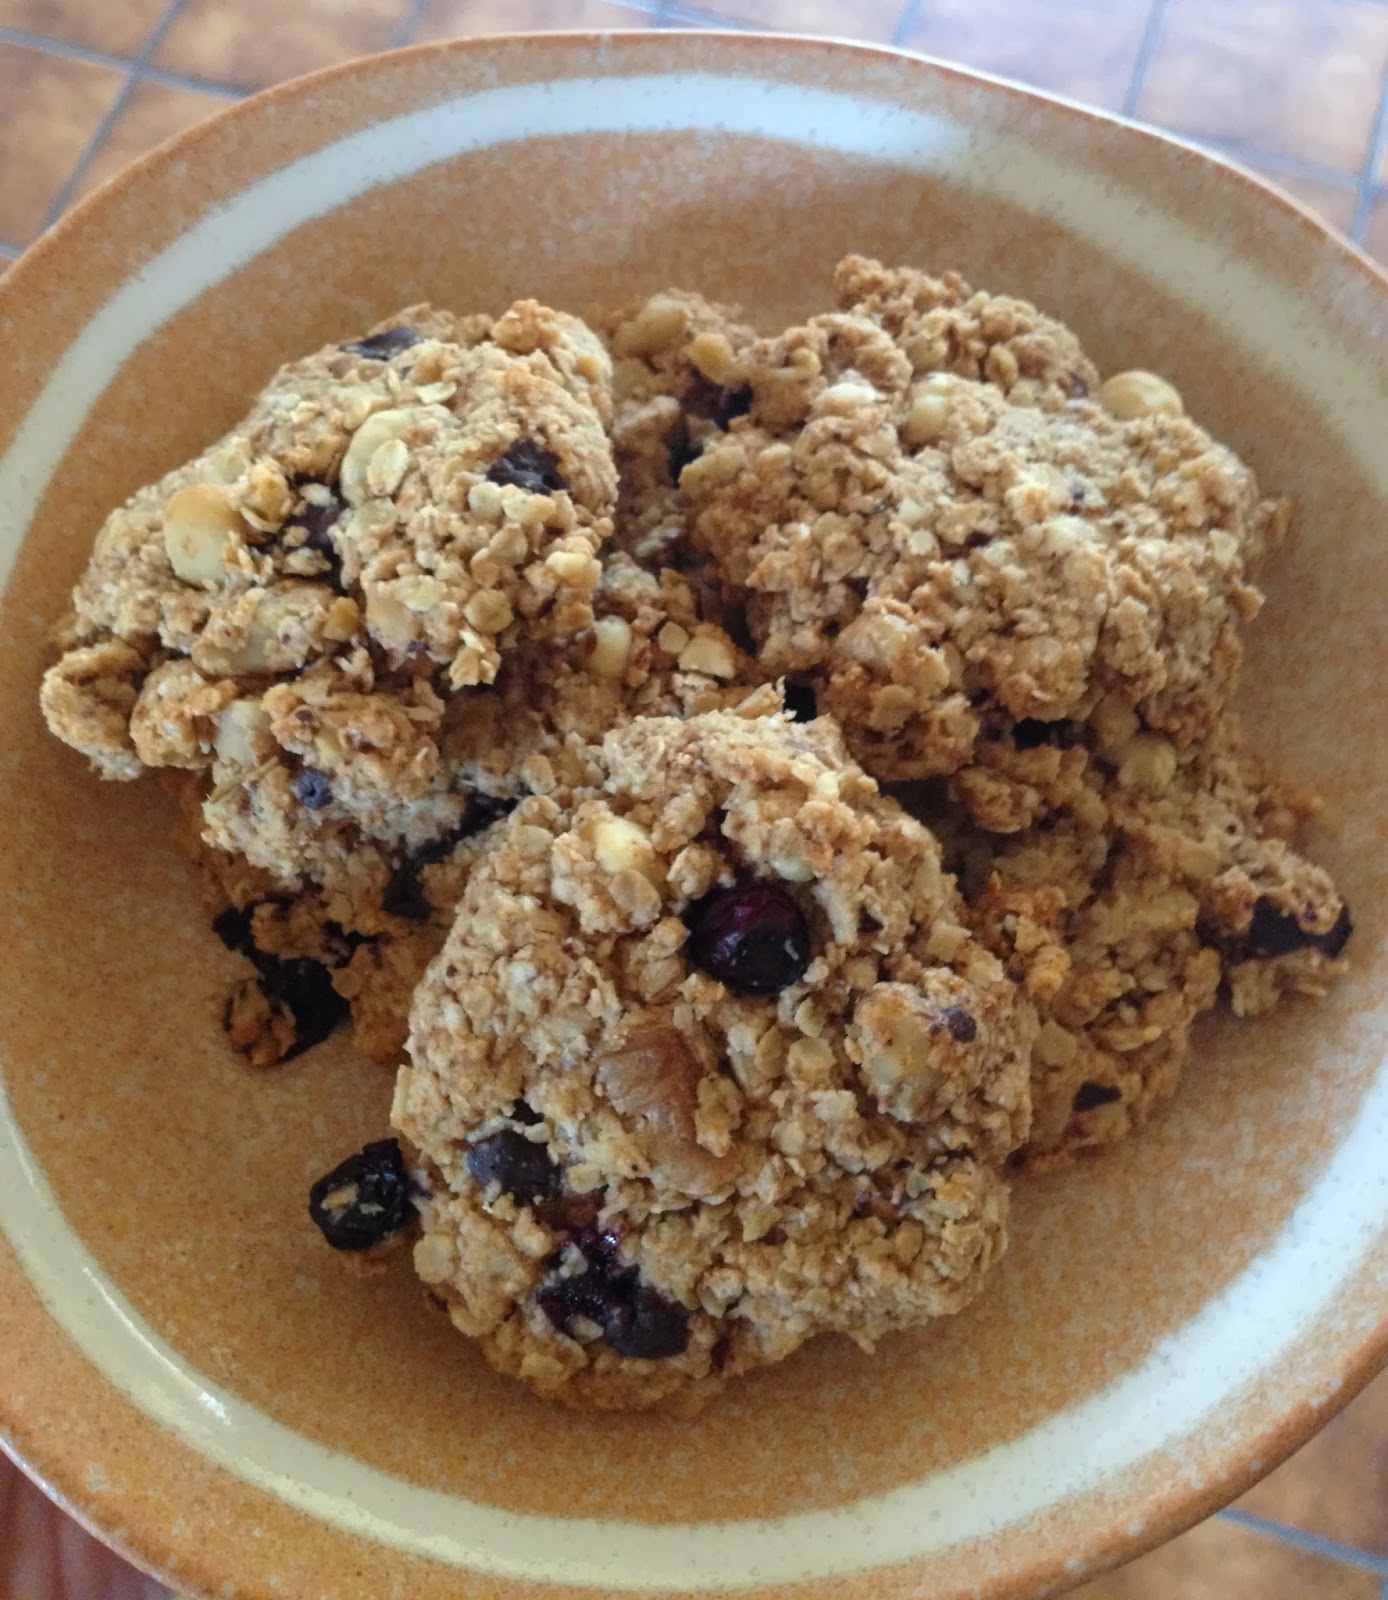
I love oatmeal cookies, but the amount of sugar and fat make me gain weight just by thinking about it. In the last year I made two oatmeal cookies my own, a healthy one and a 'try-it-before-you-diet' one! Both great but the healthy one always made me crave for the other one.
Last week I was visiting a friend, she baked these thick lovely heavy cookies. After eating one it felt like I ate a whole roll of cookies. I loved it! With the taste and satisfied belly sensation I went out looking. After downloading a new App on my phone I found it, the Ultimate Vegan Oatmeal Raisin Cookie. It ticked all the boxed, vegan -tick-, oatmeal -tick-, raisins. There was the problem, I don't like raisins. So as always, I tweaked the recipe to my liking!
The Ultimate Oatmeal Chocolate Cookie (with blueberries) source Note: The original recipe is Vegan, but I really like honey. I'll give you some vegan options too. Makes around 16 large cookies.
3/4 cup of walnuts
3/4 cup of hazelnuts
3/4 cup of almonds
2 cups of rolled oats
3/4 cup of spelt flour
4 tablespoons of coconut blossom sugar
optinal: 4 tabelspoons of brown cane sugar
2 teaspoons baking powder
1 teaspoon cinnamon
3-4 tablespoons of honey
or for the vegan option: maple syrup or something of that kind
2 tablespoons of milk substitute, I use almond or coconut milk.
3 1/2 tablespoons of coconut oil
2/3 cup of dark chocolate
optinal: substitute half the chocolate with blueberries.
Preheat oven to 350F/180C and line a baking
sheet. Place the nuts on the baking sheet. Toast in
oven for about 10-12 minutes, until golden in colour. Watch carefully so
as not to burn. When toasted remove from oven and cool for a
few minutes. Shake off the skins of the hazelnuts (if there are any). Chop the nuts, using a knife or a food processor. I like chunks of nut in my cookies, so I keep them pretty rough. But you can also ground them pretty fine.
Mix together the flour,
baking soda, 1 cup oats,
cinnamon, and sugar(s). Mix in with the nuts, using a spoon or still using your food processor. In a
small bowl add the coconut oil and microwave for 20 seconds to soften
(if necessary). In the same bowl, stir in the honey/maple syrup, and milk substitute, pour into food mixture until thoroughly combined. Mix in the remaining 1 cup of oats by stirring or with
hands. Fold in the chocolate (and blueberries). Take about 2 tbsp of dough, make a
ball, and then flatten with fingers. Place on cookie sheet. Repeat.
Bake for 10 minutes and no longer. Remove from oven and let sit
on baking sheet for 2 minutes before placing onto a cooling rack for
10-15 minutes. When cooled down, the cookies will crisp up a little more and become even more yummy! Enjoy!
This recipe is in every way not good for you. Large amounts of sugar and butter. But it's sooooo yummy. First time I made them was for my younger brother, he was feeling down, so the sugar and chocolate made him feel better. When I brought them to my friends house yesterday, both of them ate the muffin without doubt. Trying to scrape of the last bits of the cupcakepaper. Great success if you ask me.
Salted caramel Chocolate muffins yield 12 muffins
185grams softened unsalted butter
160grams caster sugar
2 eggs
230grams flour
1package of baking powder
1/2tsp of salt
60grams of Dutch cocoa powder
85ml thickened cream (For the Dutchies: ongeklopte slagroom)
85ml water
12 Lonka caramel toffee chews
Sea salt
Preheat oven to 180C. Line a 12-hole muffin/cupcake pan with paper cases. Using an electric mixer whisk the butter and sugar. Add one egg at a time, mixing until combined. Meanwhile, combine flour, baking powder, bicarbonate soda, salt and
cocoa in a bowl. Slowly add dry mixture to electric mixer, mixing until
combined. Gradually mix in cream and water to combine.
Fill each muffin case to two thirds full, smoothing over surface.
Gently push 1 caramel toffee chews into each muffin mixture, taking care not to
push too far to the bottom. Sprinkle with sea salt. Divide remaining
mixture among cases, ensuring caramels are completely covered. Bake muffins in oven for 20 minutes or until cooked through, and
caramel is runny when tested with a skewer. The bottom of the muffins will feel soft, because of the melted caramel. Remove from oven and allow
to cool slightly.
Best when still warm and caramel is still melted. If served later, reheat the muffin. 20 seconds in the microwave will do the trick. Enjoy!
A few months ago I started Postcrossing. Postcrossing is an online community that allow people to receive and send postcards all over the world. You send a postcard and will receive one back, to and from random Postcros-users form somewhere in the world.
After sending six cards, I received the first on back. All the way from Belarus. The card had a drawing of a cathedral of Minsk. On my profile I ask people to send me their favorite recipe or a traditional or local dish. And when you ask, you receive. Olga from Belarus, the sender of the card had written down one of her favorite recipes, draniki. What is the national dish of Belarus.
When I read the recipe it reminded me of rösti or hash browns, the breakfast potato pancakes from Switzerland and America. When I started to search the web for it, I found many other countries that make a kind of potato pancake. Mostly European and Middle-Eastern recipes. So we have the Czech bramborák or cmunda, the German Kartoffelpuffer or Reibekuchen, Hungarian tócsni, the Jewish latkes or latkas and many more from Latvia, Lithuania, Sweden, Luxembourg, Poland, Russia, Slovakia, Ukrain, England and Ireland. And from there on bringing it to other places on earth, like Africa and America.
I've been making potato pancakes for some years now. As a hash-brown for breakfast, as a rösti for dinner. Mixing in different kinds of potato, vegetables and seasonings. Here is my basic recipe. Potato pancake for 1 big pancake
3 mediumsize potatoes
1 onion
2 tablespoons of flour
seasoning
Peel and shred the potatoes and onion, wash them and drain. Squeeze out all the moisture. Mix in the flour and season well with pepper and salt. Heat up a large skillet and oil. Put in the potato mixture and using a fork press down the potatoes all over the skillet. Trying to make it as thin as possible. On high heat let it brown for around 7 minutes, pressing the potato down. Check the bottom if it is browning. Then flip the pancake, using a lid or by cutting it in four. Let the other side brown for around 5 minutes. Serve directly.
This is just a basic recipe, you can spice it up with different other ingredients. Add some shredded carrot, pumpkin or sweet potato. Or seasoning like smoked paprika or curry. The sky is the limit! Use it as part of you breakfast, lunch or dinner. Enjoy!
When I was young my mom always made this one lasagna. I would smell it in the house and run downstairs. Tasting her filling, her sauce, everything I could get my hands on. Impatient as I was, I would always burn my tongue on the filling.
Somehow my mom stopped making it. When I asked her the recipe some years ago, she couldn't find it. But now, many years later I relived memories. By making my moms lasagna with my own twist.
My moms lasagna
for 4-6 servings
5-6 carrots
Half a celery
3 onions
3 cloves of garlic
500 grams of ground beef
1 can of chopped tomatoes
1 package of tomatosauce
1 pack of lasagna sheets
seasoning 100 grams of grated cheese
Clean and cut the carrots, celery and onion bite size. Using a foodprocessor, chop up the vegetables and the garlic. In a heated pan, loose the ground beef until it is done. Add the vegetables and let it cok for around 5 minutes. Add the tomatoes and sauce to the meat and vegetables and bring to a simmer.
Béchamel sauce
50 grams of butter
50 grams of flour
500 ml of milk
In the meantime, preheat the oven to 180C. In a small saucepan start melting the butter. Add the flour and whisk till it start forming a thick doughy texture. Slowly add a bit of milk and keep whisking. Keep stirring the sauce, adding milk in little by little. Cooking it all the way through, thickening it up and season well. Save a little bit of milk until the end. When thick, set aside for now. Mai's twist
1 zucchini
1 tablespoon of Italian Herbs
2 cloves of garlic
1 mozzarella ball
Using a peeler, make thin length way slices of the zucchini. Sprinkle with some oil, season and grill them using a grill-pan. When done, set aside and sprinkle with some more oil, italian herbs and chopped up garlic.
Assembling the Lasagna
In a greased baking dish, scoop 1-2 soup spoons of sauce. Using your spoon, make it an even layer of sauce. Cover with lasagna sheets. Repeat once. On your second layer of sheets place the zucchini and spread evenly. Slice or tear half the mozzarella and spread in between the zucchini. Cover with lasagna sheet, sauce, lasagna sheet and sauce again.
Using your last bit of milk, reheat your béchamel. Give it some time to thicken up again. Then pour over your lasagna. Covering all the sauce. Sprinkle with the grated cheese and sliced left over mozzarella.
Place in the middle of the pre-heated oven for 30 minutes. After 30 minutes, check if the pasta is done. If desired, put it under the grill for a few minutes to brown of the béchamel cover. I would recommend resting the lasagna for 5 minutes before serving. This will make the lasagna firm up and sets the sauce.
On my lobster hooping trip we caught 6 lobsters, Californian Spiny Lobsters to be correct. The one bigger then the other. Together weighing over 10 kilo's/22 pounds.
What do you do if God gives you lobsters? You feast!
With so many lobsters you have a lot of options, here are two recipes!
Steamed lobster
This one is pretty easy. Because you will steam the whole lobster, you don't have to clean the outside. If you decide to clean the outside, just a quick rubdown, make sure to kill or numb your spiny lobster. You don't want the spikes to get you now. Put them under some running water and stick a knife in their chest. Still be carefull, they're feisty!
Fill a big pot with water, let it come to a boil. Add ginger, onions and a lot of salt. If you killed your lobsters this should be easy, if not, they will move, splash water out, make a scene. So put them in, upside down, head first. Boiling them should take around 20 minutes. Take them out, let them cool for a bit.
Now you can do what you want. Cut it in half, pick at it, grill the tail. Eat it with butter, or olive oil. Take it apart and use it for gumbo, lobster pot pie. The sky is the limit. Oh, don't forget to get rid of the guts!
Why a lobster should be fresh?
Lobsters are interesting creatures. The reason we eat them fresh is because when they die a bacteria inside the lobster starts infecting the meat. Not a great thing to eat!
Why a lobster self caught is yummier then in a restaurant?
The moment a lobster is caught and placed in a tank, he stops eating food. The lobster starts starving himself and start eating from his own flesh. Making restaurant lobsters always skinnier and less meaty since the moment they we're caught. Asian Lobster (with green onion and ginger)
Lobster
Flour
Seasoning
Vegetable oil for frying
This is the way my family prepares lobster and crab. In my opinion lobster doesn't need a sauce or anything. But for some it does.
Kill your lobsters and give them a good scrub down. No cut and clean the lobster. First take of the tail, split the head and tail. Get rid of the tail fins and antennas. Take out all the guts, brains and other insides. You will recognize the meat from the rest, the meat is clear and firm, the rest isn't. If you would like to make a sauce, keep the guts and brains. These will be the star players in your sauce.
Once you cut and cleaned it, give it a quick rinse. Toss in seasoned flour and fry in hot boiling oil until done. For me here it ends, I love lobster like this. Clean and full of flavor.
up: How to disassemble a lobster
down: Asian Lobster, without sauce, straight from the fryer
But some people want Asian lobster with green onion and ginger sauce.
This is what you need:
Guts and brains from your lobster
A couple of shallots
A bunch of green onions
Fresh ginger
Clean the onions and ginger. Cut them into strips or pieces around an inch. Heat some oil in a big pan and stirfry the onions and ginger. Add some seasoning. When almost done toss in the lobster guts and brains. Mix in with the vegetables and simmer for a few minutes. When the sauce is done it should be thick. Piece by piece swipe through the pieces of hot lobster.
up: How to make lobster gut sauce down: Asian lobster with green onion and ginger
Lobster is not something you should enjoy alone! So invite some friends or family to enjoy it with you!
Since my arrival in LA my cousin's husband is talking about his lobster hooping. Lobster is a very foreign and exotic crustatean for me. Shrimp are so common that it's not so interesting anymore, but lobster still feel high class and expensive for me. So when my cousins husband said he catches his own, I didn't hesitated. I wanted to go!
For some years one of my guilty pleasures is watching 'The Deadliest Catch', a documentary about fishermen fishing for spider crab. Although lobster hooping on a low scale, just for fun is not so scary, cold and hard work as fishing for crab or even lobster out on the open water. My lobster hooping adventure ended up being just as exciting and scary as The Deadliest Catch.
up: Me and my dad in front of the boat before hitting the water
down: Me and my nephew prepping bait on the boat
At the harbor I put myself in my banana suit and layered up. The boat hit the water and working began. Together with my little nephew I prepared the bait. Filling up the cases with chopped up sardines and salmon heads. The moment we hit open water, the power of the boat's motor became feel able. Hitting some waves and feeling the wind hitting my face.
After a fast ride we arrived in the Long Beach Harbor. We looked for places to drop our hoops and after we dropped all the hoops, an hour later, we went back to the first hoop. The Californian law doesn't allow for closed traps, so the moment you get up the hoop, you need to pull as fast as possible. This makes the lobster (hopefully) or other caught animals pushed to the bottom of the hoop, giving it no change to swim away.
Pulling up the first basket I got an idea of what was waiting for me. No lobster, but some crab and an octopus. It was such a rush, I saw octopus before, but always in aquariums, so feeling it in my hand was exciting! I was excited to do the second one, ending up with around the same catch.
As we progressed we had some empty hoops, supposedly because a seal or sea-lion played around with our bait and hoops. And then we hit the jackpot! I pulled up a 30-40 feet deep hoop, pushing my muscle limit. When it surfaced a huge lobster became visible. Holding it up at his antennas his strength became visible. He sizzed, moving his whole mouth and flapping his tail at me.
I saw live lobsters before, in Chinese restaurants and supermarkets. But never did I have to touch or hold a living specimen. It didn't look like the lobsters you see in restaurants. It had no claws and a lot of spikes, covering his antennas, head and sides of his tail.
Lob·ster, Maine and Californian from Artist book 2014, Los Angeles
In the next three or so hours we caught one after another, going bigger and bigger. Making all of us more thrilled. I felt like a little girl, going to the garden and collecting my own grown strawberries, times a 100! Coming to an end, I noticed I got tired. And the empty hoops don't really give you an energy boost.
We we're warned for incoming fog around midnight. So when we noticed some fog around 10.30pm. We decided to make a last round and go back to the harbor. Hoping to beat the fog. Within minutes after leaving the fog-less area, we ran into a layer of fog. It still looked ok, we could see lights of a big boat in the distance.
The closer the lights came, the more confused I was. I'm not a water person, so being on a boat is not an ordinary thing. I kept asking what kind and what part of the boat we saw. The answer never came. The kit boat was now so close, that I saw somebody walk out of the control chamber. I realized in a split second, we're facing the side of a boat. I looked to my left and saw a small light, suddenly the whole outline of the boat started to shape. We we're running for the side of a huge tugboat!
I don't remember what I yelled out, but we made a sharp U-turn. Causing some big waves in the water around us. From that point I was alert, focused. The next hour or so the fog became thicker and thicker. Until you could just see a few feet away from the boat. My little nephew got so scared that he just knocked out in the back.
Finally we entered our harbor. Slowly the bouys became visible, de harbor, the docks. Everyone was relived, we made it back safely. All my excitement from hooping had made place for pumping adrenaline of being scared and alert. No finally save I realized how tired I was and sat down for the first time since we left our fishing spot.
We arrived at the dock. Preparing to step on the dock, I noticed a sealion head at the back of the boat. It was so close and big, we all looked at it. Suddenly it jumped up, showing his teeth and body. My curiosity immediately turned into fear. He was jumping up just where my 10 year old nephew was sleeping. We tried to wake him and pulled him up. He didn't wake until he saw that huge sealion jump up on the side of the boat. I screamed like a little girl, yelling that we weren't safe. My nephew started freaking out too, both of us yelling and screaming.
'Blackfish' trailer
I saw sealions before, from a far in the wild and up close in SeaWorld and in the Dutch version of seaworld. Where the trainers walk around with the sealions in this clowns-act. But this was a wild animal, probably not trained and bigger than us humans. It also didn't help that I saw the documentary 'Blackfish' a week before my fishing trip. A documentary about a killer whale, that since his captivity killed (and supposedly eaten) three people.
This documentary made such an impression that my trust issues with animals
worsened. So being eye tot eye with this huge sealion, this big male,
wild sealion scared the crap out of me. I was convinced that if one of
us made a wrong move he would grab us and eat us. The sealion swam
around the boat, going under the dock, surfacing again, jumping up
again.
At this point I stood in the cooler, in the middle of the boat. Holding on to the windshield. My dad went on the dock and, in my opinion started to provoke the sealion. Clapping in his hands and talking to this huge animal. I yelled that he should stop, that it was a wild animal and that if he wanted to could just jump on the dock or boat and grab you.
Even after we left the boat and the dock, the sealion waited. Swimming around the boat. All the way until we drove the trailer (with boat) out of the water again. Until the very end I wasn't sure if the sealion would come on land and just grab one of us.
Away from the dock, loading station and most important, away from the sealion. We changed into some warm dry clothes and got ready for the ride back. At home we unloaded our catch, cleaned up and tried to get rid of the fish smell. Of to bed, tomorrow waits a lobsterfeast!
Catch of the day:
6 lobsters ,weighing up to 10 kg /22 lbs, the heaviest one weigh over 5 lbs